Getting Started with a PHP Bidding/Buying Application
Searching and Bidding on an Item
The objective of this tutorial is to write a PHP sample that enables bidding and buying on eBay, using the PlaceOffer call. It currently does not not demonstrate all of the capabilities of PlaceOffer, however. For example, the sample does not support multi-variation listings. Also, the sample does not provide the user with a way to look up currency conversion for the case where the buyer and seller are using differency currencies. You might want to let them check currency conversion rates by sending them to the xe.com Universal Currency Converter provided by eBay.
Note that while you can use PlaceOffer in the Sandbox as you would other API calls, using PlaceOffer in the production environment requires approval from the eBay Partner Network along with other requirements. If you plan to build a PlaceOffer application for use in production, the PlaceOffer Policies are required for use of PlaceOffer in the Production environment. Please carefully write your application to follow all the PlaceOffer Policies.
The completed application will look like the following:
If you want information and links for tutorial terms and API calls, see Tutorial Terms.
During the tutorial, or after completing it, please be sure to read all the sections in Additional Information and Next Steps, including the information about improving security for production applications.
eBay Partner Network (eBay Affiliate Program)
You may be able to earn money with the eBay Partner Network (eBay Affiliate Program). For more information, visit the eBay Partner Network. This tutorial contains affiliate-related code. The code is commented-out because affiliate functionality is not available in the Sandbox environment.
Prerequisites for Tutorial
- You have joined the eBay Developers Program (see the Quick Start Guide).
- You have installed Apache HTTP Server and PHP 5 and you have verified that these are working properly. You have created the following location to store files: C:\Program Files\Apache Software Foundation\Apache2.2\htdocs. You have turned on display errors (display_errors = On) in your php.ini to assist in debugging any problems.
- In your PHP installation, you have configured PHP CURL to run properly. CURL is included with PHP, but you may need to take additional configuration steps in PHP to enable CURL. PHP may not have CURL enabled by default. This sample won't work unless your PHP installation is successfully using CURL. (This sample also uses the SimpleXML extension but that should be enabled by default in your PHP.)
- Using your successfully installed Apache and PHP environment, you have made a successful eBay API call to confirm that you have a valid environment. We recommend using the simple sample Getting Started with Search in the Shopping API for this.
- In your eBay developer account, you have defined an runame for your application and understand eBay user authentication and authorization. For information on authentication and authorization tokens, making calls with authorization tokens, and on creating runames, see Making an API Call.
- You have created at least 2 test users each with names no longer than 20 characters for the Sandbox environment (one to use as a buyer, one to use as a seller). You have obtained Authentication tokens ("auth tokens") for those test users.
- You have created an active test item in the Sandbox and then waited at least 30 minutes for it
to be accessible through Search. In this tutorial, your test buyer will bid on your active test item,
so remember the title you gave to your item (or alternatively, write down its item ID) so you can search for the
item later when you run the sample. To create an item,
- Go to the API Test Tool page, and if necessary, log in using your eBay Developers Program username and password.
- On the API Test Tool page, choose Manual Input and the Sandbox environment.
- Enter your Sandbox keys: DevID, AppID, and CertID.
- Enter the authentication token for your test seller.
- Enter a compatibility level of 681.
- Enter a site ID of 0 (US).
- Under Generate API Call, select AddItemRequest.
- The default input for an AddItem request is displayed. In the default input, change the title to a title you will remember, because you'll do a search later using that title. Keep the item simple and make sure you do NOT create a multi-variation item, because this sample does not support it. Please don't change the other defaults, e.g. the category.
- Click Submit.
- Under Results, you could optionally note the value in the ItemID field, if you wanted to use the ID instead of the title when you do the search for the item, prior to bidding on the item. Note: After at least 30 minutes, when you run the application written in this tutorial, the FindItemsAdvanced call should find your item when you search for it by its title or by its ItemID field.
Sandbox AppID
After you join the eBay Developers Program, please note your Sandbox AppID so you can substitute it in this tutorial where it says "MyAppID." This tutorial uses Sandbox data. To use PlaceOffer in the Production environment, your application must first be functional in the Sandbox environment (see the PlaceOffer Policies and Guidelines).
The complete code for the tutorial (PHP_PlaceOfferGS_TradingShopping.zip) requires that you substitute your Sandbox AppID for "MyAppID".
In the tutorial, you always must substitute your Sandbox AppID for "MyAppID" and remove unneeded spaces and new-line characters.
Tutorial Steps
There are several steps in this tutorial:
Step 1: Copy files into htdocs folder
Step 1: Copy files and Add Credentials
After you complete the Prerequisites for this Tutorial, you are ready to review and copy the tutorial files into your htdocs folder and then add your credentials to the code.
- Copy the tutorial files into your htdocs folder. To copy the tutorial files:
- Download the complete code (PHP_PlaceOfferGS_TradingShopping.zip).
- Unzip PHP_PlaceOfferGS_TradingShopping.zip into a Temp folder.
- Copy all the files, and the js folder, from the Temp folder
into C:\Program Files\Apache Software Foundation\Apache2.2\htdocs.
For your reference, the files are the following:
Name Description Browsing.php Displays item information after a search. eBaySession.php Contains a class for making API calls. index.html Landing page of the application; the user will enter an item search on this page. keys.php Stores the application's keys and token.
You must substitute your Sandbox keys for the existing values in this file.
Do not store the user token; the user token is stored in a session variable (see Token.php).Login.php Begins the process of obtaining a Sandbox authentication token. Logout.php Logs out a user, destroying the session and session variables. Offer.php Contains the Offer class, used for the PlaceOffer request. PlaceOffer.php Creates an Item object, on which an offer will be placed.
Presents a form for bid submission.
Submits a bid and presents the results of the bid.sessionHeader.php Controls session settings.
It is intended to make sessions safer.SingleItem.php Contains the SingleItem class for displaying item information.
Your PlaceOffer call will input an Action field containing Bid or Purchase (for a user's bid or a user's buy).
Whether Bid or Purchase is specified is based on the listing type determined by the getDetailsAsHTML_Div function of the SingleItem class.ShowDescriptionForItem.php Enables a user to view a full item description. style.css Style sheet for the application. Token.php Contains the Token class, which gets an authentication token for a user. VerifyToken.php Enables you to verify that a user token was obtained. js\JQuery.js Toggles between the compressed and uncompressed versions of jQuery. js\ShowDetails.js Used for revealing item details. js\jquery-1.1.3.1.js_uncompressed.js Uncompressed version of jQuery; useful for development and debugging. js\jquery-1.1.3.1.pack.js Compressed version of jQuery.
- Open keys.php in a text editor.
- Add your credentials and other values, as described in the following table:
- Optionally, set the $debug variable to true if you'd like debug information to be printed as you're running the application. If you do so, search other code files for the word "debug" for other minor changes that need to be made for running the code in debug mode. In general, for information about running the application in debug mode, see the comments in the downloaded code.
- Save and close keys.php.
| Value | Description | Location for insertion in keys.php |
|---|---|---|
| Sandbox key: DevID | Your Developer ID, as registered with the eBay Developers Program; see the My Account page |
Sandbox section of keys.php: value for $devID |
| Sandbox key: AppID | Your Application ID, as registered with the eBay Developers Program; see the My Account page |
Sandbox section of keys.php: value for $appID |
| Sandbox key: CertID | Your Certificate ID, as registered with the eBay Developers Program; see the My Account page |
Sandbox section of keys.php: value for $certID |
| Initial auth token | An initial Sandbox user token (it must not be the buyer's user token) to be used by your application, before a FetchToken call is made; with a Sandbox test user, create this initial token at the following location: Auth and Auth Token Generator |
Sandbox section of keys.php: value for $appToken |
| runame | Unique identifier that is part of the mechanism for redirecting users from the standard eBay sign-in and consent page to the URL of your choice (see Prerequisites for this Tutorial). |
Value for $runame |
Step 2: User Browsing
In this step you review the code that enables a user to search for Sandbox items using the Shopping API. Then you confirm that the code runs.
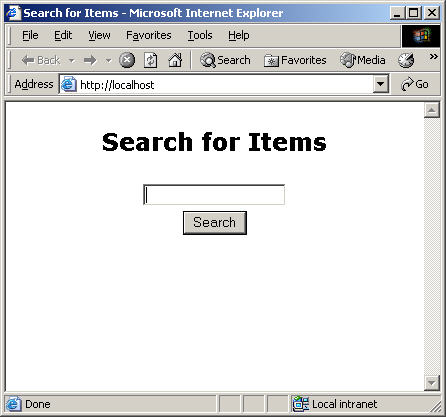
- Open index.html (located in your htdocs folder) in a text editor. Note that this file is the landing page of the application. The user will enter an item search on this page:
- Open Browsing.php in a text editor. Note that this file includes code
for a FindItemsAdvanced call, including the following snippet:
//need to urlencode the user-input keyword for the Finding API
$safeQuery = urlencode($_POST['QueryString']);
$apicall  = "$findingURL?OPERATION-NAME=findItemsAdvanced&SERVICE-VERSION=$findingVer"
          . "&GLOBAL-ID=EBAY-US"
          . "&SECURITY-APPNAME=$appID"
          . "&keywords=$safeQuery"
          . "&MaxEntries=1"
          . "&paginationInput.entriesPerPage=1"
          . "&outputSelector=SellerInfo";
For purposes of this tutorial, only one item is returned from the query (this is specified by paginationInput.entriesPerPage=1 as shown in the code snippet).
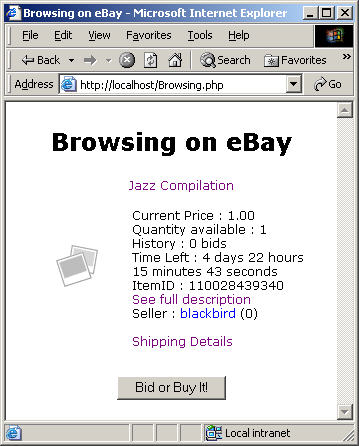
Browsing.php is just a sample file and it doesn't display all the information that should be displayed before a first bid and before a purchase (see the PlaceOffer Policies and Guidelines). For example, the Browsing.php file displays a link to the item description instead of displaying the text of the description. To see ways to list search results, choose a Search tutorial from Tutorials. - Test the search functionality of the code. In a browser, do the following:
- Open your index.html file using
http://localhost/index.html. - Enter part or all of the title of your Sandbox test item, or alternatively enter its item ID (see Prerequisites for Tutorial). Normally, a user enters a keyword for a keyword search, but for this tutorial you could use an item ID to ensure you bid on the test item you added.
- Click Search.
- Confirm that an item is displayed by the code in Browsing.php. It should be similar to the following:
- Open your index.html file using
Step 3: User log-in (Authentication)
See Working with token/authentication calls for an explanation of the authentication process.
The objective of this step is to review the files necessary for user authentication. Please note that an application cannot in any way, shape, or form collect a user's eBay username and password (see the PlaceOffer Policies and Guidelines).
To enable a user to bid or buy, an application uses a user authentication token. This tutorial does not explain user authentication; for links to information about user authentication, see Prerequisites for this Tutorial.
In this step, you review code that obtains a user authentication token (for your buyer) for Sandbox environment. This includes code that enables your application to make a FetchToken call.
- Review Login.php. The file is located at C:\Program Files\Apache Software Foundation\Apache2.2\htdocs\Login.php. You may need to increase the size and maxlength values in the input line from their current value of 50 if your test user names exceed 50 characters. (Remember that all user names in the sandbox have TESTUSER_ prepended to them.) The Login.php file contains code that sends the user to the eBay Authorization page where the user authorizes the application to access eBay. For sample code for beginning the process of obtaining a Sandbox authentication token, see the following code in Login.php:
// Get session ID for the Auth & Auth, save it in session variable for subsequent FetchToken call in Token.php. $verb1 = 'GetSessionID'; ///Build the request Xml string $requestBody1 = '<?xml version="1.0" encoding="utf-8" ?>'; $requestBody1 .= '<GetSessionIDRequest xmlns="urn:ebay:apis:eBLBaseComponents">'; $requestBody1 .= "<Version>$compatabilityLevel</Version>"; $requestBody1 .= "<RuName>$runame</RuName>"; $requestBody1 .= '</GetSessionIDRequest>'; //Create a new eBay session with all details pulled in from included keys.php $sessN = new eBaySession($devID, $appID, $certID, $serverUrl, $compatabilityLevel, $siteID, $verb1); //send the request and get response $responseBody1 = $sessN->sendHttpRequest($requestBody1); if(stristr($responseBody1, 'HTTP 404') || $responseBody1 == '') die('<P>Error sending request'); $resp1 = simplexml_load_string($responseBody1); $_SESSION['ebSession'] = (string)$resp1->SessionID; //You MUST urlencode the session ID before sending it to the Auth and Auth $sesId = urlencode($_SESSION['ebSession']); $results .= "<form name=\"form_auth\" method=\"post\" action=\"./Login.php\" >"; $results .= "<table><tr>\n<td>eBay User ID:</td> <td align=\"left\">" . "<input type=\"text\" name=\"username\" size=\"50\" maxlength=\"20\"></td>\n"; // loginURL and runame in next line comes from the required keys.php file $results .= "<td><INPUT TYPE=\"submit\" NAME=AUTHORIZE VALUE=\"Launch Auth & Auth\" " . "onclick=\"window.open('$loginURL?SignIn&runame=$runame&SessID=$sesId');\">\n"; $results .= "</td></tr></table>\n"; // use hidden field to retain fact that we're waiting on outcome of Auth and Auth call $results .= "<input type=\"hidden\" name=\"loginPending\" value=\"true\">\n"; - Review Token.php. The Token class in the Token.php file enables your application to get
an authentication token for a user. The sessionID is supplied from Login.php and is used in the FetchToken call. Notice that the session ID is not urlencoded here.
class Token { public $resp; // This is the entire response as a Simple XML object public $token; public $expiration; function __construct($username, $theID) { global $devID, $appID, $certID, $serverUrl, $compatabilityLevel, $siteID; // defined in keys.php //the call being made: $verb = 'FetchToken'; ///Build the request Xml string $requestXmlBody = '<?xml version="1.0" encoding="utf-8" ?>'; $requestXmlBody .= '<FetchTokenRequest xmlns="urn:ebay:apis:eBLBaseComponents">'; $requestXmlBody .= "<SessionID>$theID</SessionID>"; $requestXmlBody .= '</FetchTokenRequest>'; //Create a new eBay session with all details pulled in from included keys.php $session = new eBaySession($devID, $appID, $certID, $serverUrl, $compatabilityLevel, $siteID, $verb); //send the request and get response $responseXml = $session->sendHttpRequest($requestXmlBody); if(stristr($responseXml, 'HTTP 404') || $responseXml == '') die('<P>Error sending request'); //print "RESPONSE_XML = \n $responseXml \n\n"; $resp = simplexml_load_string($responseXml); $this->token = (string)$resp->eBayAuthToken; // need to cast to string (not SimpleXML element) to persist in SESSION $this->expiration = $resp->HardExpirationTime; } // __construct } // classImportant: You must substitute your Sandbox keys for the existing values in the keys.php file (see Step 1). - Review VerifyToken.php. The code in VerifyToken.php enables you to verify the token obtained
by the application's FetchToken call:
$results = '';
$results .= "<DIV ALIGN=CENTER> \n";

//the session ID
$theID = $_SESSION['ebSession'];

// Get our token which we'll need to call PlaceOffer
$tokenObj = new Token($_SESSION['username'], $theID);

// Check for existence of something that looks like a token
// Should be character string of length greater than 500 chars
// This is stronger verification of a token than simply checking for existence

if (strlen($tokenObj->token) > 500) {
    $_SESSION['token'] = $tokenObj->token;
    $_SESSION['loginState'] = 'loggedIn';
    $results .= "<form	name=\"form_auth\" method=\"post\" action=\"./PlaceOffer.php\" >";
    $results .= "<INPUT TYPE=\"submit\" NAME=\"ContinueToBid\" VALUE=\"Continue to Bid / Buy\">";
} else {
    $results .= "ERROR - We did not get a token";
}

$results .= "</form>\n";
$results .= "</DIV> \n";

print $results;
After the user logs into eBay, and clicks the Continue to Verify Token button, the token is verified. - Test the log-in functionality of the code. In a browser, do the following:
- Using http://localhost/index.html, open the index.html file that you created above.
- Enter the item ID of your Sandbox test item.
- Click Search.
- Confirm that an item is displayed.
- Click Bid or Buy.
- Enter the user ID of your test buyer, and click Launch Auth and Auth.
- A new window opens. On the Sign In page, enter the user ID and password of your test buyer, and click Sign In. Complete a sign-in of your test buyer. As soon as you've signed in your test buyer, close the window because it is unneeded.
- In the original window (where you clicked Launch Auth and Auth), click Continue to Verify Token.
- If a token was received (and thus if login was successful), then for debug purposes, the token is displayed.
A production application would not display the token. - Click the Continue to Bid/Buy button.
Step 4: Bidding and buying
The objectives of this step are the following:
- Review the code that will enable a user to bid on, or buy, an item.
- Review the affiliate parameters.
- Review the PlaceOffer Policies and Guidelines.
The PlaceOffer call enables a user to bid (make an offer) on an item. For competitive-bidding listings (Chinese and Dutch auctions), a user can make a bid. For fixed-price listings (Basic Fixed-Price and eBay Stores Inventory listings), a user can purchase an item. For information about the input and output fields of the call, see PlaceOffer.
- Review the PlaceOffer Policies and Guidelines. The policies are required for applications that use PlaceOffer in the Production environment. If you are unclear about the PlaceOffer Policies and Guidelines, please file a support ticket.
- Review PlaceOffer.php. The code in PlaceOffer.php instantiates
an Item object (as $offerItem) for the item on which an offer will be placed:
$offerItem = new SingleItem($_SESSION['ItemID']);
Additionally, the PlaceOffer.php code:- Presents a form for a bid submission
- Submits a bid
- Presents the results of the bid
- Handles bids that are too low by notifying the user
- Review Offer.php. See the following table for descriptions of the main PlaceOffer fields that are used in Offer.php.
Example of PlaceOffer Field Input or Output? Value to Your Application Action Input The type of offer being made on the specified listing. EndUserIP Input The public IP address of the machine from which the request is sent. Your application captures that IP address and includes it in a call request. As described in the PlaceOffer Guidelines, when passing in EndUserIP, use the client's external IP address (do not pass the private or LAN IP address such as 192.168.x.x). ItemID Input Unique item ID that identifies the item the user is bidding on or buying. MaxBid Input Amount of the offer placed. For competitive-bidding listings, the amount bid on the item (subject to outbid by other buyers). For fixed-price listings, the fixed sale price at which the item is purchased. For competitive-bidding listings with an active Buy It Now option, this amount will be either the Buy It Now price for purchase or the amount of a bid, depending on the offer type (as specified in Action). For PlaceOffer, the currencyID attribute is ignored if provided. Quantity Input Specifies the number of items from the specified listing the user tendering the offer intends to purchase or bid on. trackingpartnercode, trackingid, affiliateuserid Input These URL parameters enable affiliate tracking so you can earn money through the eBay Partner Network. Sample values are used. Additionally, the parameters are commented out because this is a Sandbox application. UserConsent Input If true, confirms that the bidder read and agrees to eBay's privacy policy. HighBidder.UserID Output The current high bidder. MinimumToBid Output Smallest amount the next bid on the item can be. CurrentPrice Output For competitive-bidding listings (Chinese and Dutch auctions), current minimum asking price (start price) or the current highest bid for the item if bids have been placed. For Basic Fixed-Price (FixedPriceItem), or Ad type (AdType) listings this returns the original price specified when the item was listed. - Review the Offer class. See the Offer class in Offer.php; it provides functionality for creating a PlaceOffer request. The affiliate-tracking input (trackingpartnercode, trackingid, and affiliateuserid) is commented out because affiliate tracking is not supported in the Sandbox environment. You can use affiliate-tracking input in the Production environment.
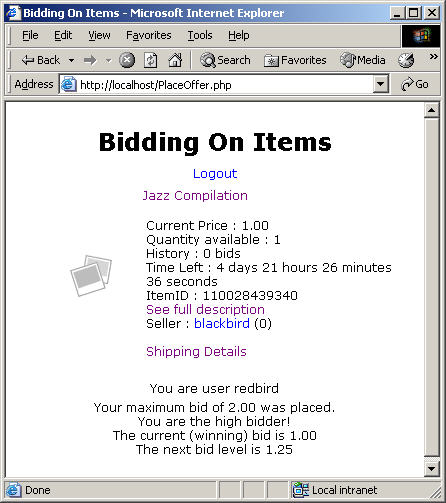
- Test the code. After you place a bid, the result should be similar to the following:
In the following snippet (from PlaceOffer.php), the value that is supplied in the Action input value (see the table below) is determined.
 if ( ($offerItem->resp->Item->ListingType == 'FixedPriceItem') ||
         ($offerItem->resp->Item->ListingType == 'StoresFixedPrice') ) {
        $Action = 'Purchase';  // action needed in PlaceOffer call
    } else {
        $Action = 'Bid';
Tutorial Terms
- eBay Partner Network. You can earn money when users perform certain actions on eBay.
- Trading API. Requires the Sandbox test users described above. This tutorial includes the following Trading API calls:
- Shopping API. Does not require Sandbox test users. Only requires a Sandbox AppID. When you make a Shopping API call, you choose whether to specify a standard value as a URL parameter or HTTP header. This tutorial includes the following Shopping API calls:
- Sandbox environment. A test environment,
with test items and users, for testing your application. For this tutorial, you need:
- Sandbox keys
- Two test users (one for selling, one for bidding/buying)
Additional Information and Next Steps
About the Sample
The tutorial sample was tested on Windows 2003 Server with PHP 5 for Win32 and Apache 2.2.4 for Windows.
Security must be improved for production use. This tutorial contains sample-code only and is not meant for production use. For example, the tutorial relies on session time-out for example purposes only. It is recommended that you put the user token in a secure database. You would require your own login for your users, and you would reuse a user's token after the user logged into your application. Additionally, other security improvements need to be made.
The limitations of the sample include the following:
- Limited support for Dutch auctions.
- The GetItemStatus call is not used to get item information. Under the PlaceOffer Policies and Guidelines, for the best performance, GetItemStatus should be used to retrieve item information.
- No support for multi-variation items.
- No support for multiple currencies.
- Limited support for "minimum bid."
- Based on the US site (site ID 0) and currency only.
- Limited error-handling:
- Although the sample includes basic error handling, it is suggested that you improve the error handling (e.g., use PHP 5 exceptions with try/catch blocks) and include a logging class to log calls and errors. See the error-handling guidelines in the PlaceOffer Policies and Guidelines.
- If an application makes a PlaceOffer request and a BotBlock container is returned, see information about the BotBlock container in the PlaceOffer topic. Under the PlaceOffer Policies and Guidelines, a BotBlock handle should be implemented wherever possible because eBay may ask users to respond to a CAPTCHA challenge from time to time. A BotBlock handle also can be treated as an error.
- If an application makes a PlaceOffer request and an error is returned based on characteristics of the item, e.g. because the item is an AutoPay item, see the PlaceOffer topic.
API Documentation
API documentation is available at the following location: Developer Documentation Center.
Next Steps
If you'd like to further develop the sample application described in this tutorial, you could consider doing one or more of the following steps:
- If your application is available in production, you may be able to update the affiliate-tracking input in Offer.php that is currently commented-out. Note that affiliate-commission functionality is not available in the Sandbox environment. Affiliate commissions from PlaceOffer require that the call be made to the site on which the item is listed. Affiliate commissions from PlaceOffer also require that the affiliate has signed up with the affiliate program on the site on which the item is listed.
- You can improve the user interface with basic add-ons, e.g. a drop-down box to display payment details.